Showing posts with label image editing. Show all posts

11 June 2012

Venus Transit

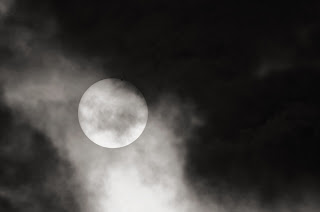
Well, it happened.  The last transit of Venus until 2117.  The viewing weather locally was pretty awful:  all clouds and little sunshine.  My dad's telescope was out, but saw nothing.

I paired my 400mm Nikkor (the old AI-S f/5.6 IF-ED version of the lens; not anything newer) with the D7000 and the Hoya ND400 (9-stop) filter, and I managed to pull out two shots between the clouds:

5 June 2012 18:16 EDT

5 June 2012 18:19 EDT
While the results were relatively meager, it was a successful use of the filter, and I'm looking forward to seeing what else I can do with it in the future.  The weeks have been busy lately, and I'm hoping to get out to take more photos soon.  I have been continuing to work on my raw workflow, too.  More pictures after the jump.

08 May 2012

The NL Filter is your friend

I'm not too familiar with Photoshop, never having used it.  I suspect that it has rather more advanced filtering than the Gimp, my usual pixel-editing program.  In any case, for those doing editing work that involves clean-up (as my latest moon shots have required), the NL filter is a huge win for you.  The link has the documentation.

07 May 2012

Over-developed Attempts with TC-301

I've made my first attempts with the TC-301.  The results are a bit over-developed, but as a start it's probably not too bad:

400 (800) mm f/5.6 @ f/8(16), 1/100s, ISO 200

25 April 2012

On ND filters

For my birthday last year, I was gifted with an ND grad (.6, i.e., two stops) filter.  I haven't used it very much in regular shooting, but a recent trip out to a local tourist trap provided some opportunities to use it.  I've been trying to refine a raw workflow, but my hardware is limited and it has been a bit of a struggle to produce images in a timely fashion.

Neutral density filters are useful for a variety of scenes.  An ND filter reduces the light hitting the sensor by some amount.  This is helpful for scenes with a wide dynamic range (e.g., a sunset) or when additional motion blur is desired.  In the former case, the filters are usually graduated so that the horizon can be set properly:  above the grade, light is reduced; below the grade it is transmitted without change.  This is the sort of filter I have, but it serves in both capacities because it is large enough to fit over a 52mm lens without touching the grade.

Images with discussion following the jump.
06 April 2012

More Moon Work

So I'm still getting started with the raw workflow.  The issues of noise and other artifacts come up pretty often when I'm working on the moon pictures, especially at 400mm.  The 70-300 seems like its not as sharp, but it also handles the noise a lot better.  I don't shoot with it anymore, so there's no definite side-by-side comparison.

I processed another photo today of the moon with RawTherapee, emphasizing better noise reduction (luminance, chrominance, and so on).  Here's the result:

400mm, 1/800s, f/11.0 @ ISO 200


For reference, here's the other processed image; it's a bit sharper, and the exposure compensation is obviously different:

28 February 2012

Vibrancy and Saturation

Thom Hogan posted a recent article on the difference between color saturation and vibrancy, and it's well worth the read for those interested in how to manage colors in post.  Most cameras have a "vivid" setting that allows users to dial up color saturation in camera, but often these settings blow out colors we'd rather leave alone.  Ken Rockwell is fond of VIVID++!!!BANGBANG!ONE!, but notes that this usually destroys skin tones, for example.

Color correction is a big subject about which I know comparatively little, but he mentions a significant issue when increasing color saturation:  linearity.  A heedless linear increase in color saturation across all spectra will lead to poor results.

While Photoshop has (I'm led to believe) a vibrancy control, the Gimp does not.  (There is a vibrancy plugin, but as far as I know it's not standard.)

A suitable method for increasing saturation in a non-linear fashion is to decompose the image into an appropriate color space and modify the saturation curve.  For the following example, I'll use an image from my shots at Hopewell Furnace.

03 January 2012

Developing Negatives Digitally

This past Christmas, my siblings gifted me a gently-used Nikkor 55mm f/3.5 AI Micro lens.  I have been wanting to fool around with a macro lens for awhile, but especially for the purpose of developing old negatives.  I visited Costa Rica in 1997 and Germany in 1999, back before I'd even thought about digital capture, and while I doubt I got much in the way of good pictures, digitizing the film seems like a fun project.

My parents also have some old slides (what a trip through the way-back machine that's been!) that I figured I could digitize as well.  My father was a photographer in his own right back in the day, and he lent me his lightbox to play around with.  I have to see if I can get his old bellows to work with the lens (that would be a minor coup), but if so, I should be able to make some pretty solid prints.

My experience with Walmart's digital scans is pretty poor.  They have a nice Fuji process for printing (which I prefer to Kodak's), but their scans are barely 1.5 megapixels and lack any sort of quality.  While I can and have doctored the images in the Gimp, it's really not nearly as good as you can produce with a suitable negative development workflow.


30 August 2010

White Balance

White balance is really critical, and I wish I had known this a long time ago. When I bought my camera to go to Kenya, I knew even less about photography than I know today—hard to believe, but true. It turns out that the weather was mainly overcast, and this led to pretty drab photos that I wanted to touch up later. As it happens, automatic color adjustments in most software programs are not really all that great: they overcompensate based on slavish adherence to the color or value curves in the image histogram (this doesn't really need to mean anything to you at the moment, but it does give me an idea for another posting sometime). This is okay when colors are normally distributed in the image, but usually they aren't—that's why we want to fix them in the first place.

The drabness of an image is often the result of improper white balancing. A warmer white balance leads to more saturated photos with deeper reds. In shady conditions, this is usually needed to counteract the bluer tones in the scene. Ken Rockwell (linked right) has a good article on white balance that's worth a quick read, and others exist on the web, too.

This is a bit of an article on my experience.

20 August 2010

Before and After

Composition remains one of my worst skills. I usually shoot very instinctively, and unfortunately my instincts are not all that great.

Often I'll shoot out the car—it's no-look shooting, don't worry; I tape the lens at infinity and don't consult the viewfinder—using the 24mm. It's fast enough, and the wider field of view gives a few more options for cropping. Moreover, the exposure is completely manual, which adds a bit of randomness—it's not adjusting to changing lighting conditions. The exposure is sometimes pretty interesting.

I am usually too lazy to edit photos, but I made an exception in this case.